
It may seem that I have been busy doing projects at my house. At least, it seems I am busy posting photos of my house. Actually both are true, I have started a few projects, and I have been posting more about the House of Miller, due to the fact that I don't have the Barn any longer. Makes sense to me...

My kitchen project has been long over due.
The project actually started many years ago, but I only finished half of the Kitchen back then. It all started because I wanted a new refrigerator. Our house was built in 1990, and evidently, the refrigerators were small back then. The space that the old fridge occupied would not house a newer, larger refrigerator, that is common these days. Once I found the "big dog, Sub-Zero" that I wanted, I knew I was in trouble. It definitely wouldn't fit in the small space we once had a refrigerator in! So we had to rip out the entire wall of cabinets and redo the entire ceiling. Which meant, new lighting and new cabinetry. All that, and only half the kitchen was touched...Phase 2 is what we just finished up.

Phase 2 is the working part of the kitchen.
Where we wash and cook.
 |
| The sink, in today's standards, looks very petite. The stainless is new to us, we are used to a porcelain sink, and I'm still not convinced if I am digging the stainless. |
 |
| I do LOVE the dark cabinets on the bottom and the over-distressed white uppers. |

Lovely, isn't it!!
I do love how it all turned out.
I painted the cabinets, put on some sassy - non matching knobs, new counter top, sink and faucet, and tile back splash. The knobs are a combination of dark bronze, glass and dark bronze pulls on the opposite bank of drawers.

The vintage cabinet has been here since part one of the kitchen redo...

this is the opposite wall.... the "big-dog fridge" I was talking about, and my coffee station. Part of the first phase of the kitchen redo years ago. As you can see, this refrigerator, was not going into a small pre-built area of any kind.

This is the other side of the fridge.
This bank of drawers was the only thing salvaged from the first tear-out. I added a new counter top... well maybe not-so-new... It is made from some salvaged wood that my neighbor was throwing in the burn pile. Score!
 |
| The canvas is one from my line that I sell. I did a series of pictures with vintage silverware, and this is one of my favorites and by far, the most popular in the series. They are available in 3 or 4 different sizes. |

you can see in this photo the not-so-new counter top. A closer look of the salvaged wood used for this bank of drawers and the coffee station.
LLLove them.

This is the before photo. ~circa 1990
Original Formica tops from when we originally built in 1990 with a 3" backsplash.
The upper cabinets I had painted white long ago, and I decided to keep the white uppers. The lower cabinets, I had painted brown with a black wash over them. That needed to go. I decided I wanted the lower cabinets a dark gray. I was going to do a milk paint or a chalk paint but I didn't have anything on hand in a dark gray and I wanted to paint immediately, "like, Right NOW." If you know me, you know I must start immediately, once I make up my mind... the closest thing to me is a Home Depot, so that is were I made a bee line to buy paint.
The original can I bought was drying slightly more blueish- gray then I liked, so I grabbed a can of Charcoal chalkboard paint, from Restoration Hardware, that I had on hand, and did a little Lori Miller home blend.
I loved the results.


This bank of drawers was were I started, and it has the blueish-gray look. I don't know if you can tell by the photos, but there is a slight difference. I like the darker cabinets with my blend, but that doesn't mean I repainted the bank of drawers. It sits off by itself and it really does look fine.


I love the " one coat " Behr paint from Home Depot.
It really goes on nice.
(I am not getting paid by Behr to say that)

the before countertop


the new stone counter.
It's called "super white"
The surface is honed and antiqued.
The honed surface means they take the polish off and the Antiquing is a technique that will texturize the veining a little deeper then the leathering technique.

If you run your hand across the top of the stone you can feel the texture.

before sink

New sink.
Undermount, single bowl, stainless.
Blanco Quatrus single bowl - medium.

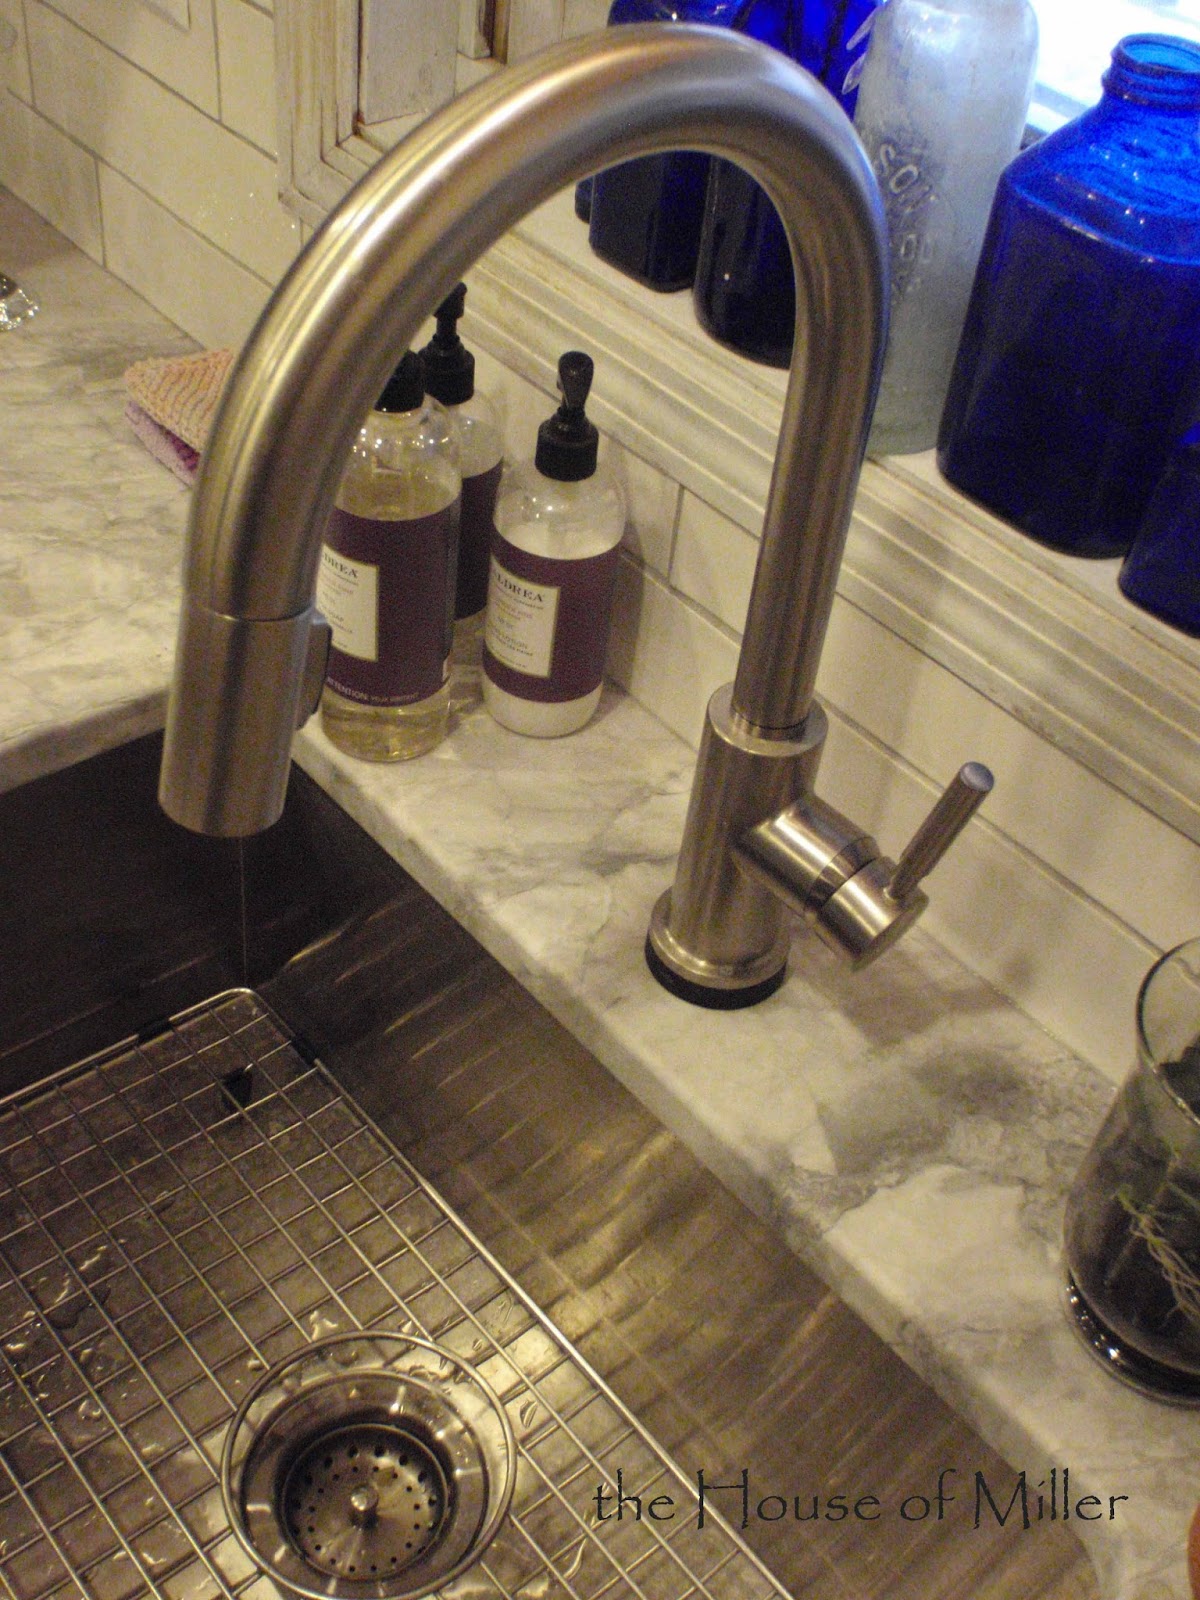
The faucet is a Delta touch from the Trinsic Collection.
Love it.
I wanted something simple, yet industrial looking.

Last but not least, the tile.
This is not the traditional subway tile, but close. I fell in love with this "hand thrown" Artisan tile from Ceramic Tileworks. Each tile is slightly off, with imperfections and irregularities. Exactly my cup of tea! The tiles are longer then the normal subway tile that is popular, these are 3 x 12" which is really fun. I used a light gray grout.
 |
| You can see how dark the lower cabinets are here. |

The combination works for me.
The stone was purchased at Cold Spring Granite and my Fabricator is AstoniA

Last on the project list was the range exhaust hood.
It was left over from the original 1990's build. It was shiny white with years of grime. YUK. I had never ordered a new one, so It needed help.
I painted it also.
I mixed my Behr gray paint with a charcoal metallic paint.
I love it also!

My motto is when it needs to be updated just paint it


I hope you had a fun tour of the new kitchen.
It was long over due on the project list, here at
the House of Miller.


No comments:
Post a Comment